Posts

Showing posts from August, 2007

Two Great New Jackets

Image
I popped into a second-hand shop last week for a bit of a browse and something interesting to do, and although I was actually looking for trousers, I almost immediately found these two great items of clothing (and no trousers, although G found me some cargo pants). The first one is a bit big, but otherwise is pretty cool as it is a '60s kind of shape with interesting back shoulders and it is an awesome colour with an equally cool looking but different blue lining. The second is the exact kind of jacket I've been wanting, and in fact intending on making. In fact started making, although single-brested and a different type of material. It is the same length, has the collar points at the same height as I wanted and the same rounded lower front corner. And it fits really well. Amazing how I found the prefect jacket! I think it is a bit darker in real life. Altogether they came to $14. The first one is good because since it is big I can wear it over lots of things and over looser th

Korean Shopping

Image
There's a shop that opened not long ago, that I can't remember what it is called now or I'd tell you. It is basically a kind of dairy/small supermarket that sells Oriental food. Mainly Korean stuff. So we went there and it was great. Here's what we bought: Kimchi, rice cakes, sweet bean steamed buns, and some snacks. We're going to go back soon and buy more and more things! I should be able to find ingredients for recipes that I haven't been able to get before. The other nice thing about this store - other than being filled with cool stuff - is that it is not a dark store with no windows (or windows covered up) in a run down building in some odd place in town like most of the other Asian food shops. No - it is bright and tidy and fairly normally situated. I was going to post a recipe, but I have been on the internet too long now and i have things to do!

Terrrain Trees

Image
For playing a certain game, Warhammer 40k , one needs terrain pieces for the little models to have to move around and shoot around and so on to make the game more enjoyable and interesting. So G made this yesterday out of some board and felt we got from Spotlight and some model trees we already had. I think it's very good. He cut the board and cut the felt and stuck them and stuck the trees one and it cost $2.50 (since we had the trees) and makes a very good piece of terrain to represent, obviously, a forest. The simple things are best.

You're Telling Us to Trim Our Hedge?

Image
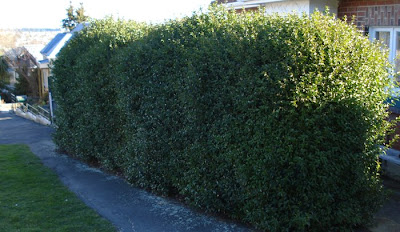
We got a letter from the council telling us that our hedge was encroaching vegetation, and that encroaching vegetation, in general, can be a danger to pedestrians and motorists. Our hedge wasn't encroaching much. It had blocked some of the pavement in one section, but the pavement is rather narrow there in any case, and there is a metre or two of grass beside the footpath before you get to the road, so I think it was fine. This is our hedge before: And this is what G did to the cable of the hedge trimmer. Luckily, we had an outdoor surge protector thingy, otherwise bad things might have happened. His confidence was shaken initially and he wanted me to finish the hedge ;) but he went and got another cable and then resumed cutting. G did the road side, and I did the house side and most of the top:

My First Patchwork - A Pincushion!

Image
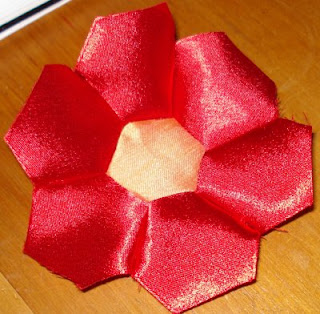
This is pretty much my first patchwork thing. I had other stuff I was going to sew this weekend, but the container my pins are kept in is breaking, both the lid and the bottom of the plastic case, so they kept escaping. So I thought I should deal with the pins first. The centre: The whole top: The whole top backed by another piece of sturdier material, pieces edge-stitched: The back because I thought the coloured outlines looked interesting...: Close-up of edge-stitching: It all sewn up, sewn onto the bottom to make something stuffable: Stuffed and finished: Not the most exciting thing ever I know, but it is cool and functional and didn't take long and used scraps! It is stuffed mostly with that white stuffing stuff, with a few small material scraps also in there. It is bigger than most pin-cushions, but my table is busy and I would lose some of the normal sized ones. It looks better in real life, on the table in its natural environment ;)

Taffeta Corset, Part 3

Image
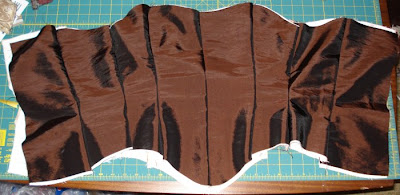
Well, I thought this was going well, but I'm not really sure now. This is the outside layer, pieces all sewn together. Remember that there are 2 layers, each made out of two layers of fabric themselves. I can't remember if I mentioned before, but I pressed all the seams on the lining layer one way, and all those on the outer layer the other. This means that when they are sewn together down the seams then that stitching actually goes through some material and is stronger. If you press the seams out to either side like one normally does then when you sew together down the seams then you are basically just joining stitching to stitching. After sewing both layers together, I graded the seams. This means that you cut all the seam allowances of a seam back different amounts so that they are no longer all the same length (see picture). Since all the layers no longer end at the same place, they will not create such a ridge under the material. Initially, this might not make much sense -

Taffeta Corset, Post 2

Image
Woohoo, today I sewed together the inner layer - the lining and one "strength layer". I have seam allowances of about 3/4" or 2 cm. But my best sewing machine only has seam allowance guides of 1cm and 1.5cm. So I either had to sew it once using one of those seam allowances and then sew it again using the width of the presser foot after arranging the needle in the correct place, or I had to sew it on the cheap plastic machine that can barely cope and isn't as COOL. But I didn't want to sew it twice so I did it on the plastic machine. I did all the seams but one, and then realised that the needle was in the wrong place so the seams weren't 2cm anyway, and I had to do them again. Hmmm... Here is the picture of the inner layer. There won't be any front opening in this one. It is also going to be VERY thick when it is finished. The kind of corset that ADDS inches. But at least the ratio will improve, and the ratio is the important thing. Why won't it show

Taffeta Corset, Post 1

Image
A while ago I started making a pattern to make an overbust corset, and then I made it some more, and then I finished it and I wasn't really sure about it and I left it for a long time. I have been wanting to make another corset for ages and of course I had the pattern for this one, and I already had the material and had some options for the lining. But I was working on other stuff, or at least trying to. Since my last one was actually quite good, but I also didn't like it, I think I was scared to start actually doing this one in case it ended up bad or something. I'm not really sure about the pattern. But I think it will probably be mostly right; there isn't really any reason why it shouldn't be. And I have to make it to find out how the pattern is, really. The design is only a simple one, and next I want to make a pattern with more complex lines instead of making them straight up and down. And I want to try a different way of making the pattern. Finally, there is a