Zupan, Post 5 - Bobble and Loop Fastenings
Today I talk about how I made the fastenings for the zupan coat. I wanted to make the fastenings and trim decoration in the style of couching and cord and frogging. So that is how this came about. It is somewhat Polish-ish.
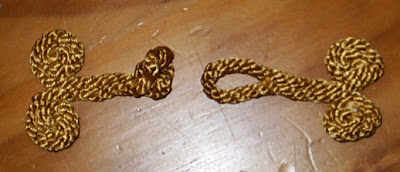
Here is the finished picture of the pair so you know what we are talking about. I can't remember what they are called, so they are now the loop and the bobble.
First, choose some cord. If you live round here, there are not many choices, and all the choices are cheap and nasty and only have the (gold) coloured thread on the surface and underneath is white. This means that any threads that get pushed aside and any fraying that happens will reveal ugly white which makes mistakes really a lot more obvious.
Step 1
Measure your cord. First you'll actually want to play around with it and work out how much you need for the size you want. Bobbles need 2-3 cm (~1") more than loops, depending on the thickness of the cord, how many knots you tie, etc.
I think mine was about 25cm or something.

Step 2
If you are making the bobble, tie 2 or 3 knots in the middle, trying to get the legs to line up more-or-less when finished. I used two knots. Just tie a simple knot, the simplest kind like starting off your shoelaces, and then tie it again in the same place, next to/over it. For a loop just fold in half of course, working out how much you need for the actual loop part.

Step 3
Start sewing the shank, however you think is best, to the desired length. I sewed through the two pieces, back and forth, but the instructiony things I had did something else that I didn't think was as good. But do as you like, it also depends on how well your thread matches and whether you can allow any of it to actually show. Mine matched real good. :)

Step 4
The damn annoying tricky bit - fold one end round into a spiral and try and hold it while sewing it together so it doesn't fall to pieces. The worst bit was actually how much the end frayed, and trying to stop it from doing so and making sure the white fraying bit only showed on one side, the bad side, although generally a bit showed on the good side. However, even if it is not perfect it still looks all right. I sewed back and forth through the spiral, first one way, then the other, also attaching it to some of the shank.

Step 5
Do the other spiral, trying to make sure any mistakes are on the same bad side as the other mistakes, or you will be very annoyed. This is my best one.

It's not a great explanation, but it is not too hard to do, mainly fiddly and a bit annoying, but I reckon you can manage with some practise. It does take a while, but it is pretty cool when they are all made, and you go "what on earth, did I make those? I am crazy". Anyway, it makes you pretty cool. MAKE SURE YOUR LOOP GOES OVER THE KNOT (bobble). I made each loop AFTER making the bobbles, and each loop went with a particular bobble so I knew that there was guaranteed at least one fitting loop. Then after making the loop I hooked it over the bobble to keep them together. Not everything ends up the same size and this might just save a little bit of trouble.
Let me know if this ends up being useful to you ok? Or if it inspires you to try it cos you realise it is possible. This is the first thing I have ever done like this and the first thing with cord.
Variations you could do on this is to do some kind of cool knot for the bobble, although I don't know anything about knots so I don't know what. Something with a cool shape or something. If you used thinner cord and created a relatively large knot you could plait it or something for the shank. You could make a different kind of shape for the spiral perhaps. There must be some variations if you became too good at this initial design.
Here is the finished picture of the pair so you know what we are talking about. I can't remember what they are called, so they are now the loop and the bobble.

First, choose some cord. If you live round here, there are not many choices, and all the choices are cheap and nasty and only have the (gold) coloured thread on the surface and underneath is white. This means that any threads that get pushed aside and any fraying that happens will reveal ugly white which makes mistakes really a lot more obvious.
Step 1
Measure your cord. First you'll actually want to play around with it and work out how much you need for the size you want. Bobbles need 2-3 cm (~1") more than loops, depending on the thickness of the cord, how many knots you tie, etc.
I think mine was about 25cm or something.

Step 2
If you are making the bobble, tie 2 or 3 knots in the middle, trying to get the legs to line up more-or-less when finished. I used two knots. Just tie a simple knot, the simplest kind like starting off your shoelaces, and then tie it again in the same place, next to/over it. For a loop just fold in half of course, working out how much you need for the actual loop part.

Step 3
Start sewing the shank, however you think is best, to the desired length. I sewed through the two pieces, back and forth, but the instructiony things I had did something else that I didn't think was as good. But do as you like, it also depends on how well your thread matches and whether you can allow any of it to actually show. Mine matched real good. :)

Step 4
The damn annoying tricky bit - fold one end round into a spiral and try and hold it while sewing it together so it doesn't fall to pieces. The worst bit was actually how much the end frayed, and trying to stop it from doing so and making sure the white fraying bit only showed on one side, the bad side, although generally a bit showed on the good side. However, even if it is not perfect it still looks all right. I sewed back and forth through the spiral, first one way, then the other, also attaching it to some of the shank.

Step 5
Do the other spiral, trying to make sure any mistakes are on the same bad side as the other mistakes, or you will be very annoyed. This is my best one.

It's not a great explanation, but it is not too hard to do, mainly fiddly and a bit annoying, but I reckon you can manage with some practise. It does take a while, but it is pretty cool when they are all made, and you go "what on earth, did I make those? I am crazy". Anyway, it makes you pretty cool. MAKE SURE YOUR LOOP GOES OVER THE KNOT (bobble). I made each loop AFTER making the bobbles, and each loop went with a particular bobble so I knew that there was guaranteed at least one fitting loop. Then after making the loop I hooked it over the bobble to keep them together. Not everything ends up the same size and this might just save a little bit of trouble.
Let me know if this ends up being useful to you ok? Or if it inspires you to try it cos you realise it is possible. This is the first thing I have ever done like this and the first thing with cord.
Variations you could do on this is to do some kind of cool knot for the bobble, although I don't know anything about knots so I don't know what. Something with a cool shape or something. If you used thinner cord and created a relatively large knot you could plait it or something for the shank. You could make a different kind of shape for the spiral perhaps. There must be some variations if you became too good at this initial design.


Comments