The Brown-Orange Dress
The dress. Blurry face because I wanted to see if I could do that in photo-shop. Ha-ha.
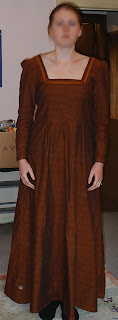 Ok, so it isn't really that orange, but sort of.
Using this material - this is a picture of it with the light falling on it, although it can look better than this also. It ranges from a kind of dull brown to this colour, and if it falls in certain ways looks orange and in others, black. Hmm, that picture is kind of big, but we will try and live with it ok? This is also the same material and dress I posted about a couple of days ago and have been waiting to get pictures of and so on.
Design
Well, it was tough. This is a sort of test-run for my wedding dress, one part of my wedding outfit. I was having all sorts of trouble working out how I wanted to do the skirt, although I had worked out I wanted a fitted top with a square neck and little puff-top sleeves. For some reason. I wanted the skirt to be smooth over the hips, I think. That was part of the problem - I didn't really know what I wanted. I was thinking of a full skirt but didn't want it to stick out around the waist and hips for some reason. I tried a bias cut dress, but bias cut is a pain and it didn't hang OUT but IN. As in, it didn't stick out when it hung in folds, more sort of folded in towards me.
Pattern
So, I used my torso base pattern, as drafted from "Pattern Making for Fashion Design". I had drafted this before, but only to modify to make other patterns. I never copied it onto good paper because I had never tried it out properly and I didn't want to waste the good paper in case it was a bad pattern. So it was still on newspaper and I could never, ever find it, spending days trying to find it, and actually using it, modified, more times than my other self-drafted patterns. So maybe I should make a good copy. So I modified that pattern to not have shoulder darts at the back (because of wide neckline) and to have a similar neckline to the black dress I made a while ago. I consolidated the two front waist darts into one because I hate sewing darts. It has two back waist darts and a front bust dart also.
Aside:
Now for the skirt. Skirts are theoretically easy because they don't have to FIT as such. So long as they don't fall off and you can get into them you can do what you want. Just choose a basic shape. If you want to try drafting your own pattern, try a skirt. In the afore-mentioned book it tells you how to draft the basic (and many other) skirt pattern. I just use the top of this as a yoke or as the top of a skirt and attach flared shapes or whatever on the bottom. It is a simple trapezium each for front and back, with curved instead of straight sides, and then darts front and back. It could be easily created on a person rather than with measurements, and with a bit of thought you can probably work out how to do it from measurements without instructions. And it works really well. At least it did for me. By far the easiest and most useful base pattern.
Back to pattern:
So what I did for this dress is just drew a line on my pattern paper that started at the waist and went out as it went down. Like the side of a triangle I mean. In fact, since I drafted the torso first and then made the skirt on another bit of paper to stick together later, I did in fact make a big triangle with the top point cut off flat. This flat top had to be as wide as the waist of the torso pattern. And I had to make sure that the slope went out enough to go over my hips. And that was it.
What about the sleeves? I had already drafted a basic sleeve from my book, and this is my second favourite easy and versatile base pattern. It also worked really well. You need a french curve though, but rather than buying and expensive one, you can trace the one in the back of the above book and draw it on cardboard or plastic (eg. from a hobby shop) and voila! Then I followed the, once again easy, instrustions to create the small leg-of-mutton sleeve pattern. Worked really well.
Draft
I did actually make a test piece for the torso section, out of some bits of old sheet. It worked fine, but instead of making the square neck actually square, I decided to angle it in so it was narrower at the shoulders to correct the fact that it moved out on the shoulders when I was wearing it.
Sewing
After making the pattern, I pretty much just sewwd it together. Darts in, down the front and back, up the side, remembered there were sleeves, unpicked the top of the side, attached sleeves at shoulder adding in little tucks for the fullness, realised that the little tucks looked better on the under-side where they were the other way around, decided I didn't care but would remember for later, sewed sleeve underside and onto top of unpicked side (easier that way), hemmed bottom, hemmed sleeve.
Neckline - I can never be bothered making bias binding, so I just cut strips off the material and ironed in half, then ironed the two edges under then sewed that on to finish the neck line. Hemming anything that isn't straight is just too much of a pain, so I use facings, which I also hate, or, now, bindings. Then I sewed my unlikely find of brown-orange trim stuff around the top. Then I wore it to my partner's work's Christmas dinner. I was going to put trim around the sleeves but I finished it 15 minutes before we had to go and I still had to find appropriate underwear and shoes and do something to my hair. Since it sits far out on the shoulders and is somewhat low-cut it made underwear-finding harder than usual.
Zip - oh yeah, there was a zip too. This was done by my favourite method of sewing up the seam the zip is going to go in, pinning the zip over this on the inside, sewing it in with prick stitch (by hand) and then unpicking the seam. Then, all except at the top where the actual zip bit is, the material ends to cover the zip and you don't have to worry so much about pinning it in the right place and the material slipping around and stuff. And prick stitch (like back-stitch, but taking smaller, separated stitches on the good side, unless I have the name wrong) is fairly unobtrusive and looks nice and neat.
Changes
I think that's all. Changes that need to be made for next time are:
 And the back and side. Maybe it needs to be ironed, but that's how it was from wearing and sitting down all day. See the nicely invisible-mostly zip?


And the sleeve. A bit crushed from wearing a jersey all day over it. It wasn't so sharply creased before. Also pretty colour.

 Ok, so it isn't really that orange, but sort of.
Using this material - this is a picture of it with the light falling on it, although it can look better than this also. It ranges from a kind of dull brown to this colour, and if it falls in certain ways looks orange and in others, black.
 Hmm, that picture is kind of big, but we will try and live with it ok? This is also the same material and dress I posted about a couple of days ago and have been waiting to get pictures of and so on.
Design
Well, it was tough. This is a sort of test-run for my wedding dress, one part of my wedding outfit. I was having all sorts of trouble working out how I wanted to do the skirt, although I had worked out I wanted a fitted top with a square neck and little puff-top sleeves. For some reason. I wanted the skirt to be smooth over the hips, I think. That was part of the problem - I didn't really know what I wanted. I was thinking of a full skirt but didn't want it to stick out around the waist and hips for some reason. I tried a bias cut dress, but bias cut is a pain and it didn't hang OUT but IN. As in, it didn't stick out when it hung in folds, more sort of folded in towards me.
Pattern
So, I used my torso base pattern, as drafted from "Pattern Making for Fashion Design". I had drafted this before, but only to modify to make other patterns. I never copied it onto good paper because I had never tried it out properly and I didn't want to waste the good paper in case it was a bad pattern. So it was still on newspaper and I could never, ever find it, spending days trying to find it, and actually using it, modified, more times than my other self-drafted patterns. So maybe I should make a good copy. So I modified that pattern to not have shoulder darts at the back (because of wide neckline) and to have a similar neckline to the black dress I made a while ago. I consolidated the two front waist darts into one because I hate sewing darts. It has two back waist darts and a front bust dart also.
Aside:
Now for the skirt. Skirts are theoretically easy because they don't have to FIT as such. So long as they don't fall off and you can get into them you can do what you want. Just choose a basic shape. If you want to try drafting your own pattern, try a skirt. In the afore-mentioned book it tells you how to draft the basic (and many other) skirt pattern. I just use the top of this as a yoke or as the top of a skirt and attach flared shapes or whatever on the bottom. It is a simple trapezium each for front and back, with curved instead of straight sides, and then darts front and back. It could be easily created on a person rather than with measurements, and with a bit of thought you can probably work out how to do it from measurements without instructions. And it works really well. At least it did for me. By far the easiest and most useful base pattern.
Back to pattern:
So what I did for this dress is just drew a line on my pattern paper that started at the waist and went out as it went down. Like the side of a triangle I mean. In fact, since I drafted the torso first and then made the skirt on another bit of paper to stick together later, I did in fact make a big triangle with the top point cut off flat. This flat top had to be as wide as the waist of the torso pattern. And I had to make sure that the slope went out enough to go over my hips. And that was it.
What about the sleeves? I had already drafted a basic sleeve from my book, and this is my second favourite easy and versatile base pattern. It also worked really well. You need a french curve though, but rather than buying and expensive one, you can trace the one in the back of the above book and draw it on cardboard or plastic (eg. from a hobby shop) and voila! Then I followed the, once again easy, instrustions to create the small leg-of-mutton sleeve pattern. Worked really well.
Draft
I did actually make a test piece for the torso section, out of some bits of old sheet. It worked fine, but instead of making the square neck actually square, I decided to angle it in so it was narrower at the shoulders to correct the fact that it moved out on the shoulders when I was wearing it.
Sewing
After making the pattern, I pretty much just sewwd it together. Darts in, down the front and back, up the side, remembered there were sleeves, unpicked the top of the side, attached sleeves at shoulder adding in little tucks for the fullness, realised that the little tucks looked better on the under-side where they were the other way around, decided I didn't care but would remember for later, sewed sleeve underside and onto top of unpicked side (easier that way), hemmed bottom, hemmed sleeve.
Neckline - I can never be bothered making bias binding, so I just cut strips off the material and ironed in half, then ironed the two edges under then sewed that on to finish the neck line. Hemming anything that isn't straight is just too much of a pain, so I use facings, which I also hate, or, now, bindings. Then I sewed my unlikely find of brown-orange trim stuff around the top. Then I wore it to my partner's work's Christmas dinner. I was going to put trim around the sleeves but I finished it 15 minutes before we had to go and I still had to find appropriate underwear and shoes and do something to my hair. Since it sits far out on the shoulders and is somewhat low-cut it made underwear-finding harder than usual.
Zip - oh yeah, there was a zip too. This was done by my favourite method of sewing up the seam the zip is going to go in, pinning the zip over this on the inside, sewing it in with prick stitch (by hand) and then unpicking the seam. Then, all except at the top where the actual zip bit is, the material ends to cover the zip and you don't have to worry so much about pinning it in the right place and the material slipping around and stuff. And prick stitch (like back-stitch, but taking smaller, separated stitches on the good side, unless I have the name wrong) is fairly unobtrusive and looks nice and neat.
Changes
I think that's all. Changes that need to be made for next time are:
- more angling in at the neck perhaps, still not sitting square.
- I actually had to modify the shoulder seam so there was not so much on the inside at the neckline. I can't remember if it slipped off the shoulders or gaped or both or something else. So, see to that in the actual pattern so the shoulder seams are straight on shoulders.
- make "triangle" of skirt wider at back than at front, because bums are wider than the front across the hips so I think this would make the fullness of the skirt more even around.
- I had the idea also of making the skirt more full by adding pointy triangles into the side and front and back seams of the skirt bit. This is the same as just making the triangle of the skirt flare more, but requires less continuous material, so I can lay out the pattern more efficiently perhaps. I didn't do that on this one.
- maybe make slightly bell-shaped sleeves ie. wider at the cuff. At least, wider than they are now. I like that idea now.
 And the back and side. Maybe it needs to be ironed, but that's how it was from wearing and sitting down all day. See the nicely invisible-mostly zip?

And the sleeve. A bit crushed from wearing a jersey all day over it. It wasn't so sharply creased before. Also pretty colour.


Comments