Posts

Showing posts with the label corset

Waisted Efforts - Book

A couple of years ago, I set up a search on Trade Me for the corset books that were generally regarded as pretty good, so that it would email me if someone was selling them. The likelihood that someone would first buy and then actually sell on TradeMe one of these books was low, but I was patient, and recently "Waisted Efforts" came up and I got it at a fraction of the price (like a half or a third) that it would cost to buy it from overseas, thus making it a price that I would reasonably pay for a book here if I really wanted it. Woohoo! It arrived today and it is thicker (fairly chunky), slightly bigger (about landscape A4), and a lot more readable than I thought it would be. I was sort of thinking of it more like a reference book only, but it looks like you could read through it rather than just flick to relevant pages. This is good. For some reason I thought it was written by a woman, and read through the overview and preface with this in mind, before seeing that the pref...
Taffeta Corset, Part 3

Image
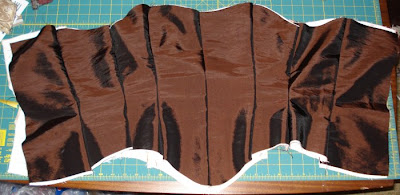
Well, I thought this was going well, but I'm not really sure now. This is the outside layer, pieces all sewn together. Remember that there are 2 layers, each made out of two layers of fabric themselves. I can't remember if I mentioned before, but I pressed all the seams on the lining layer one way, and all those on the outer layer the other. This means that when they are sewn together down the seams then that stitching actually goes through some material and is stronger. If you press the seams out to either side like one normally does then when you sew together down the seams then you are basically just joining stitching to stitching. After sewing both layers together, I graded the seams. This means that you cut all the seam allowances of a seam back different amounts so that they are no longer all the same length (see picture). Since all the layers no longer end at the same place, they will not create such a ridge under the material. Initially, this might not make much sense -...

Taffeta Corset, Post 2

Image
Woohoo, today I sewed together the inner layer - the lining and one "strength layer". I have seam allowances of about 3/4" or 2 cm. But my best sewing machine only has seam allowance guides of 1cm and 1.5cm. So I either had to sew it once using one of those seam allowances and then sew it again using the width of the presser foot after arranging the needle in the correct place, or I had to sew it on the cheap plastic machine that can barely cope and isn't as COOL. But I didn't want to sew it twice so I did it on the plastic machine. I did all the seams but one, and then realised that the needle was in the wrong place so the seams weren't 2cm anyway, and I had to do them again. Hmmm... Here is the picture of the inner layer. There won't be any front opening in this one. It is also going to be VERY thick when it is finished. The kind of corset that ADDS inches. But at least the ratio will improve, and the ratio is the important thing. Why won't it show ...

Taffeta Corset, Post 1

Image
A while ago I started making a pattern to make an overbust corset, and then I made it some more, and then I finished it and I wasn't really sure about it and I left it for a long time. I have been wanting to make another corset for ages and of course I had the pattern for this one, and I already had the material and had some options for the lining. But I was working on other stuff, or at least trying to. Since my last one was actually quite good, but I also didn't like it, I think I was scared to start actually doing this one in case it ended up bad or something. I'm not really sure about the pattern. But I think it will probably be mostly right; there isn't really any reason why it shouldn't be. And I have to make it to find out how the pattern is, really. The design is only a simple one, and next I want to make a pattern with more complex lines instead of making them straight up and down. And I want to try a different way of making the pattern. Finally, there is a...

Finished Corset

Image
So I finished this nearly two weeks ago, but I didn't have any pictures I liked because I didn't have anything really suitable and good to wear it over. But now, here are some pictures. I don't really like the style, actually, I realised when it was made, but otherwise it is good and well made I think. First the inside and outside layed flat. Then me wearing it wwith 3 different shirts. :) Some photos not very good because it is a bit dark in the room and cameras don't like that. You'd think 2 light bulbs in an average sized room would be enough. The best thing in the pictures is clearly my hair from the back.

Corset Progress Report

Half the eyelets done! Only 16 to go! I did 9 today. I'll probably finish it on Tuesday?

Houndstooth Corset, Part 5 - Nearly Finished

Image
The binding, at least along the bottom edge, turned out to be a lot easier than I had thought, particularly since I sewed it by machine and not by hand so it was speedy. It was purchased black bias binding, sewn on on the front first, then folded over and "stitching in the ditch" on the front to attach it to the back, although it had to be unfolded at the back or it didn't stretch over far enough. So all in all the inside is a bit ugly, but I suppose that doesn't matter too much. The outside looks good. I then alternated between cutting some of the cable ties to length (for boning) and making eyelets by hand. I don't have any decent eyelets that don't muck up half the time, so I don't want to use them for good things. The only time I've used them is for my goth dress where they are mostly decorational. To get them in you have to cut the material, and if you cut it too much then the eyelet will come out and the whole thing is a disaster, even if the eye...

Houndstooth Corset, Part 4 - Construction

Image
I won't go into too many details about construction really, as there are various ways to do these things, and a million steps in a a variety of different orders. I made myself a big list of everything to do and in what order, about 20 things, and then partially followed it. Here's a picture for reference for this post. I cut out the other two layers and sewed them at the seams. I folded over the front and back ends of the inner layer and overlocked them and sewed them down as more boning channels, and cut strips of material and sewed them on next to these, but over a bit, to make the channels that go down the other side of the laces. I cut of the excess material at the bottom and sewed along the bottom to seal the channels. I remembered about the waist tape, that helps stop it stretching along the bit with the most stress on it, and sewed it on just in the seams and at the ends, which I just realised means that at the seams means it is essentially sewn onto nothing but other s...

Houndstooth Corset, Part 3

Image
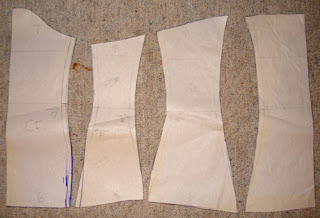
After deciding that my very badly done sheet mock-up with no boning was going to be ok, I made a nice new pattern incorporating the changes, and added a 1" seam allowance. Here you can see the pattern, without seam allowances, all nicely labeled with "top" and "bottom" and the waistline and which piece connects to which on what side. I made it up in cotton something, canvas maybe, that I had bought specifiacally for this sort of thing, and I bought it in pink so I would remember it was strictly utilitarian purposes because I would never use pink for anything otherwise. I used the seam allowances to make the boning channels, because that was a lot easier than making separate channels and generally sounds like a good idea, since they are there anyway, adding bulk to the whole thing. Here are some pictures of various views on the dress dummy, with uncut lengths of cable tie in place as boning and generally roughly pinned on and so on. You can see come ribbon thro...

Houndstooth Corset, Part 2

Image
I'm not sure what to write actually, and didn't take many pictures. I am making a post about how to make an underbust pattern, but I thought I should finish mine first and see if I am really qualified to say such things. I made my first pattern, based on instructions from a site I can no longer find, from memory, because it is really a very simple concept, but I made a major idiotic mistake, probably because I was very hungry and my thinking was very messed up. I did it while nothing was happening in pattern-making class. So, when I realised my idiocy the next day, I made another, which went a lot better and made a lot more sense. Which I will explain later when mine is all finished and good (hopefully). There are three main, simple categories of underbust corset in terms of shape of the top and bottom edges. flat or slightly curved edges curved between bust pointy! They're crappy little drawings, I know. So anyway, the point is I decided to go for number two, forgetting th...

Houndstooth Corset

Image
So anyways, onto the makings! Here are my 3 materials; first person to spot the joke, nay, pun, gets.... umm, to be really great. From left to right, outer "fashion" layer, strength layer, lining. Here's the lining by itself, because it is cool. Isn't it cute? I wish it was the outside now, but how wearable is it, really? Ha ha, short entry. But it had pictures.

The Houndstooth Collection

As part of my set of clothing made in houndstooth and black materials, I am making a corset, as well as a skirt, jacket and trousers. The idea is a kind of corporate-wear collection, like a suit, with the jacket and either trousers or skirt, and the corset will fit in with the outfit. Worn with a white shirt for maximum corporatability. Given that both the corset and skirt will be houndstooth it may be impossible to wear them together without blinding people, but I may make another black skirt as well. Normal business-wear, at least how I perceive it, having never met any woman who has to wear any kind of suit for work, generally consists of a suit jacket and either dress trousers or a skirt, where the skirt is only about knee length - a little longer or shorter or at the knee. Perhaps heels would be worn, perhaps make-up. The whole idea seems to be to make the woman dress like a businessman while still remaining traditionally feminine and looking nice. Looking nice and being tradition...

More On that Victorian Corset I Made Last Year

Image
Here's a link to a post I did in a LiveJournal community about the Victorian corset I made last year, in case you are interested again for some reason. The Link. Here's the best bit of that entry anyway, a new pic.

Corset Waist-Tapes?

Image
When you make a corset, you often put a "tape" around the waist to help prevent stretching. The tape must obviously be the most unstretchy thing you can find, and then even though you have already made sure at least one layer of the corset is as stretchless as you can get, this makes sure of it. Because obviously if you do it up and it stretches, it kind of defeats the point, and you might not be able to do it up any further to compensate. To give an idea of how little stretch you want, say you have a waist when reduced of 70cm. 1% stretch would be 0.7cm. Since you might have a waist reduction of 7cm, this is 10% of the reduction. Quite a lot. The waist-tape also gives added strength to the area under the most strain. I was looking for some appropriate tapes for this purpose, and I am not sure if these are right but this is what I found: The natural coloured one might be cotton, while the other two are synthetic but not too horrendous. They do not seem to stretch. You can jus...

My Weekend - Gardens and Corsets

Image
So this weekend I didn't feel like writing 4 blog entries in preparation for the coming week like I did last weekend. But we'll see what happens in the next 1.5 hours. It would be a lot easier and more fun if the right shift key on this keyboard didn't only work intermittently. It hardly ever works when I try to do a capital 't', but I'm not sure if that's just pretty much the only letter I capitalise with the right hand. Other than 'i'. I think it is just the shift key that is breaking, stupid shift key. This weekend, what did I do? Garden Well, I cut the lawn a little on both days, with the scythe, and now it is a lot shorter, and a lot flatter. I think I am getting better though. The lawn looks a lot bigger now as well without all the grass. G and I also cleared the sticks off at some point, maybe that was last weekend and I already talked about it? Anyway, from when the hedge and stuff was cut, there were sticks all over the grass. Actually, they...

Wearing my Corset

Today I decided to wear my corset to work, over a shirt and under a jacket to see how it was. I also had to show some people who wanted to see it. I thought it would be a good test as well to see if it was wearable before having to wear it for several hours with no opportunity to remove it if I dressed up in costume. So far I have found out the following; see the list below arranged in order of comfort and convenience, from most to least: standing, walking, eating, drinking - perfectly normal walking quickly up slight incline, running up a flight of stairs - want to breathe slightly more than average sitting in normal chair - slightly more restricted breathing tying shoelaces - have to do something bizzare to reach foot sitting in bucket seats in car - rather more restricted breathing that annoys me, but not enough to make me feel faint or anything putting on socks - hard to get foot high/close enough to both hands to put socks on (both hands because not to hard to get foot to one hand...

Finished Victorain Corset!!

Image
So, at some time in the last week I finished the corset. Now I will spend some time tediously uploading pictures and trying to make them appear in the correct place, given that the typing place in the blog, the preview and the finished page all layout the page differently. And I have no idea what it might look like in IE or other web browsers. Or whatever else. Anyway, corset lying flat: It is also not clear to me why all pictures that I insert insist on showing up at the top of the page, requiring me to move them, instead of being inserted at the current position of the cursor. That would be handy. I think the corset produces a great shape and looks like a real corset and I am very clever :). That shape at the bottom of the centre-front isn't right I don't think, but never mind. Corset front, back and side: Apparently, I stand funny, as you can see from the back view. Or the corset is made funny. Although the second is most likely true, I think the first one is too. Either thr...

Victorian Update - Corset and Petticoat

Image
I have progressed a lot on my corset and it is now nearly finished. The eyelets were all sewn by hand, getting progressively better with practice. This is what gave me OOS, but they look really cool.... See how much better the second ones are. I wasn't sure whether there should be boning over the hip along the waist cos it looked hard todo, but in the pictures there was stitching along there, so I put some in between the material along the seamI couldn't insert it because it is the seam where all the vertical pieces meet the horizonal hip gore piece and it was too messy. So I sewed some ribbon along the inside and put it in there. It is very messy, but seems to be working, mostly. I couldn't get a busk, so am using hook and eye tape. The eyes are juuuust poking out of the material, with the tape part sewn in between the lining and outer material, with the edge whip-stitched up. The hook bit wouldn't have worked like that. The hook and eye tape kind of folds in half w...