Posts

Showing posts with the label crafts

Pink and Blue Linen Apron

Image
Craft from Xmas 2015 I made this apron as a Christmas present for my sister in 2015. The blue flower fabric is linen, the pink is a linen-cotton blend. I quite like making aprons because they're fairly easy and you can use colours that people often wouldn't find acceptable for other types of clothing. I can't remember if I used a pattern - I might have got one from one of my "complete sewing guides" which often have instructions for basic household items at the back. I always find it hard to work out what measurements to use for aprons with top pieces - how wide and how tall?
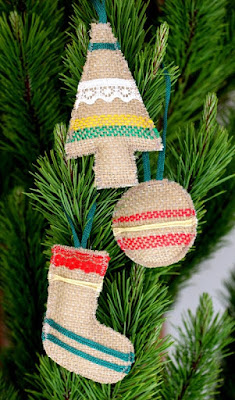
3 Xmas Decorations

Image
A craft from 2015 These 3 Christmas decorations were made from coffee sacks. They are zig-zag stitched around the edge in brown thread, and stuffed with just a tiny bit of stuffing to make them a bit less flat. They are decorated with scraps of lace and cord, and the templates were positioned to make the most of the printing on the sack as well.

Coffee Sack Xmas Decorations with Matching Bears

Image
Craft from December 2015. I think I made these for secret santa gifts. I didn't make the bears - those are from when I sent to Japan ages ago, in 1999. I was given them by the mother of a homestay family; they were samples from this kind of mail-order company she worked for, I think. To make the decorations, I used scraps of coffee sacks, a bit of stuffing, and various small pieces of ribbon and lace to decorate them. I think the purple strip is either a piece of polar fleece or a piece of felt. The edges of the circles are zig-zag stitched. These are one of the few "photogenic" crafts I have made. You could almost imagine this picture in a craft book or on a fancy web site! Normally my things look so haphazard, with no design principles, all the wrong colours and fabrics, and nothing matching for the photo. These are really easy to make. Make a circle template by tracing around a cup or something. Cut out your base fabric - you don't want it to be somethin...

Little Naalbinding Pouch

Image
This craft is from March 2015 We went to a medieval joust in Upper Hutt, and there was a woman there who was teaching people naalbinding, so I learnt how to do this little stitch, and made this little pouch out of the little bit of acrylic yarn she provided. I got some kawakawa leaves from my tree and dried them and put them in a plastic bag in the pouch and gave it to my friend who gave me the tree. Of course, I've forgotten how to do it now, but it wouldn't be hard to learn again. That's the problem with all these crafts though: you have to keep going and re-learning them every time you want to make something; unless you somehow manage to keep all of them up and in practice.

Drop Spindle Spinning

Image
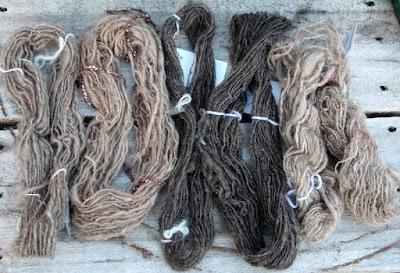
Spinning done as of June 2016 Once at an A&P fair I bought a home-made top-weighted drop spindle off a lady, with a bit of wool. I then got a bottom-weighted one from Oamaru (I think), but I didn't like it as much. Here's some of the spinning I had done by mid-2016, a few years ago. I don't really know if I'm doing it right because for some reason I couldn't find any videos showing people doing the same style that I was doing - I found bottom-weighted spindles, people spinning really really think wool, people spinning with the spindle supported on a table or something, but not just top-weighted drop spindle with thin wool. I just got out of the library a whole book on drop spindle spinning though, so hopefully that will be useful! My favourite wool is the dark stuff, which is like, still in its little shorn pieces, not brushed all fluffy like the other ones.

Wheat Bag for the Cat

Image
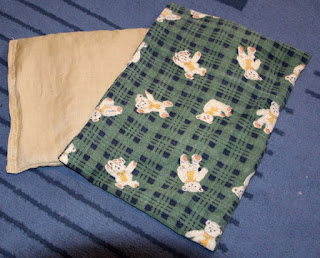
Another old craft from May 2016. Our house is cold and we don't want our cat to get too cold at night, so I made her this wheat bag. The interior bag is linen, and the exterior cover is old pajama material. I chose the linen because you heat the bag in the microwave and linen has a high ignition temperature - so, in case one of the little wheat guys gets super hot somehow, it's less likely to actually catch fire. I chose the outside because it is soft and furry and cats like that sort of thing. It is also easily washable. We heat it up in the evening and put it on the couch where the cat sleeps so she can snuggle it. Sometimes she actually does.

Refurbished Acorn Bag

Image
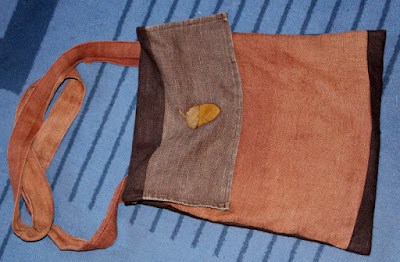
This is another post from a craft from ages back - from May 2016 in fact. I like to fix and refurbish things. I like to see how they change over time, and I like to see what they're like when they're fixed, and how long they last, and all sorts of things like that. It's something that can only happen over a period of years, and softly. There's literally no other way to experience something aging and wearing than to use it and to wait. I think that nowadays we seldom get to experience this because a lot of stuff - although it becomes old and worn out - was not nice enough and of good enough quality originally to be worth reworking. So we end up with rubbish instead. I orginally made this back for G, and he uses it to carry a book to read when we go out to cafes and such. It was getting holes in the back and in the straps. So I took it apart and gave it a new back and new reinforcement at the bottom (out of the same original fabric). I kept the front and the flap. I...

Book Bag with Elastic Closure

Image
At the beginning of 2017 I made this book bag for my Mum. It is lined and has an elastic closure. I also gave her a book inside it. Shown below empty, and then front and back containing the book. The trickiest part was deciding how long to make the elastic so that it would hold it closed nicely but also accomodate different sized books without damaging them. It would also be nice if you could get different coloured elastic, but you can't at any of the stores here. It's made from nice Japanese printed cotton with a slight texture on the surface, and I think lined with pink linen.

Homemade Gift Tags

Image
I hesitate to exactly call these a craft, since there is a minimal amount of work in making them. However, I want to start actually using more of the things that I have saved for future use, so these are the first - something very simple to get started. Gift tags cut from Xmas and birthday cards, with holes punched in them. Now I no longer have these old Christmas cards sitting around, I have new gift tags for next Christmas (as I was down to two), and I can recycle all the off-cuts. I saw a "how-to" on a craft blog, and theirs were super fancy - they had a special cutter to cut them into a nice shape, presumably a normal hole punch whereas I think mine is a leather punch, fancy string to tie through the hole, and old cards which produced a much more hipster-crafty kind of result. So even gift tags cut from old cards don't look as pretty as the ones you see on the internet, but I still think they're quite nice and more than functional. It is quite fun working out...

Shopping Bag for Mum's Birthday

Image
I got some fabric from my favourite seller on TradeMe, with the intention mostly of using it for crafty things like bags, because sometimes it just doesn't work making clothes out of "fun" fabrics. I asked Mum which she liked, so that when I got round to making bags, I could whip one up for her too. Then, it was a couple of days before her birthday so I thought I'd make it to put her presents in. I started out trying to make a pattern from what I remembered of a bag I saw on the internet, but it wasn't working, and it didn't really seem actually possible. I booted up my computer and went and actually looked at her bag, and it was in fact different from what I had been trying to make. So the pattern for THAT bag, was obvious, and what I was trying to do had in fact been impossible after all. I try to make a lot of impossible things. It's annoying. I need a different type of material to make stuff out of. Anyway, the site in question is this one . I basicall...

Gwri's Birthday

Image
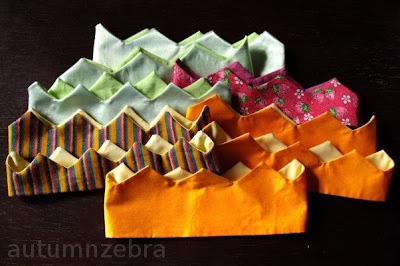
Some time ago, was Gwri's birthday. We were going to Christchurch to see his parents around his birthday, and they were coming to Dunedin after that, so we thought we should have the birthday dinner when they were here -I think that's how it went. But, I think one should always do something on your actual birthday, so I bought a giant muffin and lit a big red candle for his "actual birthday" birthday cake, and we had tea with the teapot and milk jug and everything. There isn't a really good photo cos it was kind of dark, so I can't really post one. Then, when his parents were here, we had a proper birthday dinner. I made crowns for everyone to wear out of some of my favourite fabrics. They're like paper hats from Christmas crackers, but made of fabric. They're all lined, interfaced, and machine sewn except for the join at the back which is hand-whip-stitched closed. Everyone had the option to keep their crown, and some people did. The one at the front...

Crochet Hook Case

Image
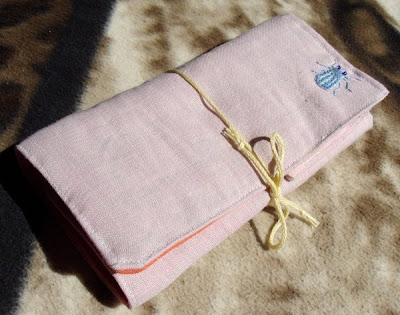
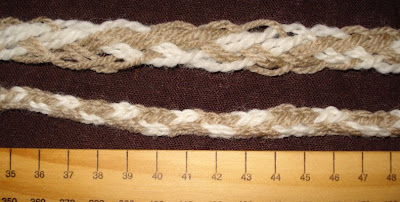
I wanted to make a case for my knitting needles so that they had somewhere tidy and sensible to go, and it was going to hold crochet stuff as well (although I never crochet, but you know, you need the stuff anyway...) but I decided to make a smaller case to hold the crochet needles by themselves. It is made of linen, and has a beetle embroidered on it, and ties up with a finger braid cord I made. Pictures below: The cord is made of fairly fine thread so takes a while to "braid" - it uses 5 loops of thread to braid it, so 10 strands. It's my first proper actual use of one of these braids (which were made in the medieval and tudor times for tying and lacing all sorts of things) other than using one to wrap a present for Mum's birthday. There are various problems with how it is sewn so I will make the knitting one more carefully, and maybe embroider TWO beetles on it. Maybe I'll even have better photos of those beetles.

Felt Flowers of the More Hippie Persuasion

Image
I made some felt flowers for myself in a different style to the last ones; I like this style better. Here's a nice picture of the first three: And a poor picture of those 3 plus the next two. They all sort of represent focuses or whatever for the year. I wanted to make some of these flowers for myself anyway, so I thought I'd combine them into a tangible form of these focuses, as writing lists on bits of paper gets boring. The orange one with the circles is juggling, and the blue one is 18th century clothing.

Green Spot Bag!!

Image
There's a curtain and furnishings store near our house that sells the most expensive fabric ever, a lot of which isn't even that nice. It's really odd. Their cheapest stuff looks a lot like the cheapest stuff from Spotlight, but costs literally ten times as much. I have spent much time trying to understand this, but have got nowhere. They do have a remnants/ex-samples bin where each piece is $2, which has many small, interesting pieces of fabric in it. The largest is generally only big enough to make a knee-length skirt or a sleeveless top, but the smaller pieces could be used as accents... or for bags!! Which brings us to this awesome satchel-style bag I made. The piece of fabric was just the right size to make this excellently sized bag, and the dots are a raised pile i.e. they're furry. I lined it in some nice, slippery fabric and bound the edges in cotton poplin. The strap is made out of the same poplin which was interfaced and then folded so that the strap is 4 lay...

Felt Flowers

Image
During the year I collect ideas for presents for people, including tutorials on how to make them, and save them in my email. One of the ideas was "felt flowers" eg. for brooches. We bought a gift for one of our "secret santa" recipients at Gwri's work, but I am feeling all crafty so thought I'd make a felt flower to add to it. I didn't much like the ones in the tutorial I had seen and saved, so I did a google image search for felt flowers to get ideas for shapes and styles and found lots of good ideas, and I decided to make one like this one (picture from this site ): I've got some pictures of some more "hippie" style ones that I, personally, actually like better, but they're probably not so universally attractive and acceptable, and we don't really know the recipient's style. So, here are my two - the red one is for me, which I made to test the pattern and method, and the blue and white one is for her. They turned out really n...

Belated Christmas Post 3 - Presenty Stuff

Image
Random pics of things I made or liked or whatever... It seemed like a good idea to follow the inspiration in the Spotlight catalogue and make food covers out of mosquito net with fabric around the edge as a presnet for my Mum. However, I discovered I don't really understand about getting a wide fabric border around a corner, and it was a total mess and really annoying. I wanted to sew one edge on, then fold it over and sew the other edge down on the other side like you can do with bias binding (as this seemed like it would be like a giant binding, essentially), but out of 4 sewing books, only one gave instructions for this kind of thing and those instructions were more-or-less "when you reach the corner, leave enough fabric to mitre it" and then when sewing down the other side "mitre the corner" - ok, not very specific there. I had the most success folding it in half first and sewing down both edges at once, and just messing with the corners when I got to them,...

Christmas Shopping Bags

Image
I think I'll try and post some pictures from Christmas, before they become completely irrelevant... I made shopping bags to put everyone's presents in (except my husband's because I do most of the shopping so it would be like giving the bag to myself), out of fair trade cotton calico and leftover scraps of fabric I had. Since it's fair trade, and not on special, it's rather expensive, and with the cost of labour these shopping bags would cost about $50, as compared to $2 like they do when you get them from the supermarket. Of course, mine are a bit fancier than the $2 ones, but still... However, it was lovely lovely material, it felt very nice and it was really nice to sew. The weird thing is that cutting it felt a bit like cutting some silk I had- like the feeling through the scissors was similar in the way it sliced through it. Very odd. For those that like cutting fabric, you could cut this all day; it was lovely. So I did some of it batch-wise, and some of it in...

Christmas Decorations

Image
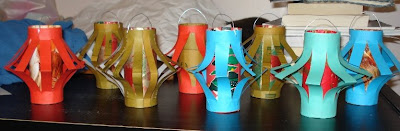
I made Chinese Lantern decorations. I wrapped cardboard toilet rolls in old wrapping paper that was cool but too crumpled to use to wrap presents then made the outer lantern bit out of coloured cardboard or this other very thick wrapping paper. I think it's better to have the outside patterned, but it needs to be stiffer than just paper. Wire through holes made in the side with a needle is used to hang them on string (I used blue hemp twine) across the opening to the stairs and the hole in the wall between the kitchen and dining room. They look really good hung up actually. If you make some, I think a yellowish or reddish paper on the inside is best, to be a bit more "lantern-like".

Lets Try Fingerloop Braiding

Image
From this website (http://fingerloop.org/) : Fingerloop braids are braids woven using loops (or "bowes") of string on your fingers. Fingerloop braiding reached a high point in Medieval Europe and England between 1200 and 1600 CE. This braiding technique still survives today in isolated areas of Europe, the Middle East, South America and Japan. Said website had instructions from manuals from the 1400's - 1600's telling you how to make the fingerbraids. It's like more complicated finger-knitting like we did at school. (At my school finger knitting involved only one finger and making loops, which we used to make friendship bracelets, not the more fingers kind of finger knitting.) I always wanted to know how to do more complicated ones, but no one knew. However, I was looking at this because of my 16th century outfit I am making, and these can be used for the laces. I won't explain anything about it because the website is really good and you can just go look a...

Strawberry Box

Image
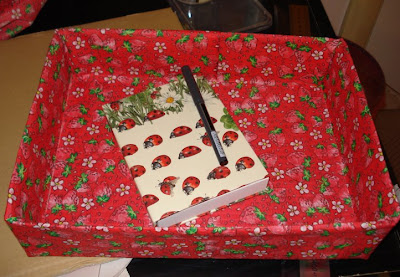
I covered the lid of a computer paper box with material, to make a tray to put stuff in for the day - like, put my diary in, and the things I have to put in my bag like wallet, etc. Otherwise, I forget every day to look in my diary, and forget to take things to work with me. There's no use putting things in your diary if you never remember to look in it - I look in it about once a month. I also got myself a calendar, but I never look at that either. Here it is with a notebook and pen in it, the pen should give you an idea of size. Here it is when I was making it, and the cat was helping (no flash, indoors, so photo a bit funny).